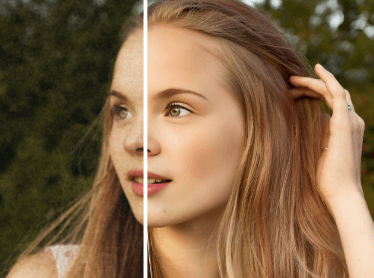
In today’s visually-driven world, a captivating image can speak volumes. Whether you’re a professional photographer, a budding influencer, or simply someone who loves sharing moments with friends and family, the quality of your photos matters. We’ve all been there: a fantastic shot marred by poor lighting, a slightly blurry subject, or dull colors. This is where an image enhancer comes to the rescue, transforming ordinary pictures into extraordinary visuals.
This comprehensive guide will delve into the world of image enhancement, explaining what an image enhancer is, how it works, and how you can leverage its power to make your photos truly shine.
What is an Image Enhancer?
At its core, an image enhancer is a tool, often software-based, designed to improve the quality and visual appeal of digital images. It works by applying various algorithms and adjustments to correct imperfections, optimize colors, sharpen details, and generally make a photo look more professional and aesthetically pleasing. Think of it as giving your photos a digital makeover, bringing out their hidden beauty.
These enhancers can range from simple, one-click solutions to sophisticated programs offering granular control over every aspect of an image. The goal, however, remains consistent: to make your pictures look their absolute best.


Why Do You Need an Image Enhancer?
Even with the most advanced cameras and smartphones, images can sometimes fall short of perfection. Here are a few common scenarios where an image enhancer becomes indispensable:
- Poor Lighting Conditions: Photos taken in low light often appear grainy or dark. An image enhancer can brighten them, reduce noise, and reveal hidden details.
- Dull Colors: Sometimes, colors in a photo can look flat or washed out. Enhancers can boost saturation, adjust vibrance, and correct color imbalances.
- Lack of Sharpness: A slightly out-of-focus shot or one lacking crisp details can be frustrating. Enhancers can sharpen edges and bring clarity to your subjects.
- Unwanted Imperfections: From minor blemishes on a portrait to distractions in the background, an enhancer can help you clean up your photos.
- Creative Expression: Beyond correction, image enhancers allow you to apply artistic filters, effects, and styles to your photos, transforming them into unique works of art.
- Professional Presentation: For businesses, content creators, and anyone showcasing products or services, high-quality images are crucial for attracting attention and building credibility. An image enhancer ensures your visuals are always top-notch.
How Does an Image Enhancer Work? The Underlying Magic
While the user interface of different image enhancers may vary, the core principles they employ are often similar. Here’s a look at some of the common techniques and adjustments an image enhancer utilizes:
- Brightness and Contrast Adjustment: This is fundamental. Brightness controls the overall lightness or darkness of an image, while contrast defines the difference between the lightest and darkest areas. Adjusting these can add depth and drama.
- Color Correction and Grading:
- White Balance: Ensures that white objects in a photo appear truly white, correcting color casts caused by different light sources.
- Saturation and Vibrance: Saturation controls the intensity of all colors equally, while vibrance intelligently boosts muted colors more than already saturated ones, leading to a more natural look.
- Hue: Adjusts the overall color tint of an image.
- Color Curves and Levels: These advanced tools allow for precise control over the tonal range and color balance of an image, letting you fine-tune highlights, midtones, and shadows independently for each color channel (Red, Green, Blue).
- Sharpening and Noise Reduction:
- Sharpening: Enhances the edges and details in an image, making it appear clearer and crisper. This is often achieved by increasing the contrast along edges.
- Noise Reduction: Removes unwanted grain or speckles (digital noise) that often appear in low-light photos, resulting in a smoother image.
- Clarity and Dehaze:
- Clarity: A localized contrast adjustment that makes mid-tones pop, adding a sense of depth and dimension without affecting highlights or shadows too much.
- Dehaze: Effectively removes atmospheric haze or fog from an image, restoring lost contrast and color.
- Cropping and Resizing: Essential for framing your subject, removing distractions, and preparing images for different platforms.
- Retouching Tools: Many advanced image enhancers offer tools for spot removal, blemish correction, red-eye reduction, and even more complex manipulations like skin smoothing.
- AI-Powered Enhancements: The latest generation of image enhancers leverages artificial intelligence and machine learning to automate complex adjustments, often with remarkable results. AI can intelligently detect objects, faces, and scenes, applying optimized enhancements without manual intervention.
Choosing the Right Image Enhancer: A Comparison
The market is flooded with various image enhancement tools, catering to different skill levels and budgets. Here’s a comparison of some popular options:
| Feature/Tool | Adobe Photoshop | Adobe Lightroom | Online Image Enhancers (e.g., Fotor, Pixlr, Canva) | Mobile Apps (e.g., Snapseed, VSCO, LightX) | Dedicated AI Enhancers (e.g., Topaz Labs, Luminar Neo) |
| Skill Level | Professional/Advanced | Intermediate/Professional | Beginner/Intermediate | Beginner/Intermediate | Intermediate/Professional |
| Cost | Subscription-based (Creative Cloud) | Subscription-based (Creative Cloud) | Free (with limitations) to Paid Subscriptions | Free (with in-app purchases) to Paid | One-time purchase or subscription |
| Key Strengths | Extensive range of tools for comprehensive image manipulation, graphic design. | Excellent for photo organization, non-destructive editing, batch processing. | User-friendly interface, quick edits, ideal for social media. | On-the-go editing, intuitive touch controls, filters. | Advanced AI capabilities for noise reduction, sharpening, upscaling, style transfer. |
| Ideal For | Graphic designers, photographers needing deep retouching, complex composites. | Photographers managing large libraries, extensive color grading. | Casual users, bloggers, quick social media posts. | Smartphone photographers, quick enhancements before sharing. | Users seeking high-quality, automated enhancements for specific tasks. |
| Learning Curve | Steep | Moderate | Low | Low | Moderate |
| Offline Access | Yes | Yes | Often requires internet connection | Yes | Yes |
Export to Sheets
Step-by-Step Guide to Enhancing Your Images
While the specifics will vary depending on the image enhancer you choose, here’s a general workflow you can follow to enhance your photos effectively:
- Import Your Image: Open the image enhancer and load the photo you wish to edit.
- Assess the Image: Before making any adjustments, take a moment to analyze your photo. What are its weaknesses? Is it too dark, lacking color, or out of focus? Identifying the problems will guide your editing process.
- Basic Adjustments (Brightness, Contrast, Exposure):
- Start by adjusting the exposure to ensure your photo isn’t too dark or too bright.
- Next, fine-tune the brightness and contrast to add punch and definition.
- Tip: Be careful not to overdo it, as this can lead to crushed blacks or blown-out highlights.
- Color Correction (White Balance, Saturation, Vibrance):
- If your photo has an unnatural color cast (e.g., too blue under fluorescent lights), adjust the white balance to make colors appear accurate.
- Boost the saturation or vibrance slightly to make colors pop, but again, avoid oversaturation which can make photos look unnatural.
- Sharpening and Noise Reduction:
- If your image appears soft, apply a subtle amount of sharpening to enhance details.
- If there’s visible grain (noise), use the noise reduction tool to smooth it out.
- Note: Too much sharpening can introduce artifacts, and too much noise reduction can make an image look plasticky. Find a balance.
- Cropping and Straightening:
- Crop your image to improve composition, remove distracting elements, and focus on your subject.
- Use the straighten tool to correct any crooked horizons or lines.
- Advanced Adjustments (Optional):
- If your image enhancer offers them, explore tools like curves and levels for more precise control over tones and colors.
- Experiment with clarity and dehaze to add depth or remove atmospheric fog.
- Use retouching tools to remove blemishes, dust spots, or other imperfections.
- Apply Filters or Presets (Optional):
- Many image enhancers offer pre-set filters or styles that can dramatically change the look and feel of your photo with a single click. These can be a great starting point for creative effects.
- Save Your Enhanced Image:
- Once you’re satisfied with your edits, save your image. It’s often a good practice to save a new version to preserve the original file.
- Consider the file format (JPEG for web, TIFF/PNG for higher quality) and resolution depending on where you plan to use the image.
Tips for Effective Image Enhancement
- Less is Often More: Subtle enhancements often yield the best results. Over-editing can make a photo look artificial.
- Work on a Calibrated Monitor: To ensure accurate color representation, if you’re serious about editing, consider calibrating your monitor.
- Understand Your Tools: Take the time to learn what each slider and tool in your chosen image enhancer does.
- Context Matters: Consider the purpose of your photo when enhancing it. A dark and moody shot might not need as much brightening as a vibrant landscape.
- Practice Makes Perfect: The more you experiment with different images and settings, the better you’ll become at recognizing what works best.
- Backup Your Originals: Always keep a copy of your unedited photos in case you want to revert to the original or try a different editing approach.
FAQs About Image Enhancers
Q1: Can an image enhancer fix severely blurry photos? A1: While an image enhancer can slightly improve the sharpness of a mildly blurry photo, it cannot fully recover details from a severely out-of-focus or motion-blurred image. There are limits to what software can reconstruct.
Q2: Are free online image enhancers as good as paid software? A2: Free online enhancers are excellent for quick, basic edits and for users who don’t need advanced features. Paid software generally offers a more comprehensive set of tools, greater control, higher output quality, and often, more robust performance.
Q3: Will using an image enhancer reduce the quality of my photo? A3: If used correctly, an image enhancer improves quality. However, excessive or improper use of certain tools (e.g., over-sharpening, aggressive noise reduction) can introduce artifacts or make the image look unnatural. Saving in a highly compressed format like a low-quality JPEG can also reduce quality.
Q4: What’s the difference between photo editing and image enhancement? A4: Image enhancement is a subset of photo editing. Enhancement typically refers to improving existing qualities and correcting imperfections (brightness, color, sharpness). Photo editing is a broader term that includes enhancement, but also encompasses more complex manipulations like compositing, adding elements, or major transformations.
Q5: Can I enhance multiple photos at once? A5: Many professional and even some advanced consumer-level image enhancer tools offer batch processing capabilities, allowing you to apply the same adjustments or presets to multiple photos simultaneously, saving a significant amount of time.
Conclusion
In an age where visual content reigns supreme, the ability to produce stunning images is more valuable than ever. An image enhancer is an indispensable tool in any digital creator’s arsenal, allowing you to transform your photographs from good to absolutely captivating. By understanding the principles behind image enhancement, choosing the right tools, and applying a thoughtful approach to your edits, you can unlock the true potential of your images and make them truly stand out. So go ahead, experiment with an image enhancer, and let your creativity shine through every pixel!